My drive suddenly changed from NTFS to RAW after a restart, and now I can’t open it or access important files. I need the safest way to convert a RAW drive to NTFS without data loss, or recover the data first before formatting. Looking for help with the best steps and tools to avoid making the problem worse.
I’d hold off on converting it to NTFS right away. When Windows shows a partition as RAW, what I’ve seen is simple, it no longer understands the file system sitting there. The cause varies. I’ve run into this after a bad unplug, a write job getting cut off, file system damage, weak sectors, junk software, and once on a drive that was dying and took its sweet time admitting it.
The main thing is this. Your files are often still on the drive. So I’d pull data off first, then mess with repairs later.
Step 1: Look at the drive in Disk Management
Open Disk Management and check whether the drive shows the expected size. If the capacity looks normal, even with RAW showing up, I’d still treat recovery as worth trying. If the drive keeps vanishing, shows the wrong size, or starts making weird noises, I’d stop there. I’ve ignored those signs before. Bad call. Repeated reads on a failing drive tend to make things worse.
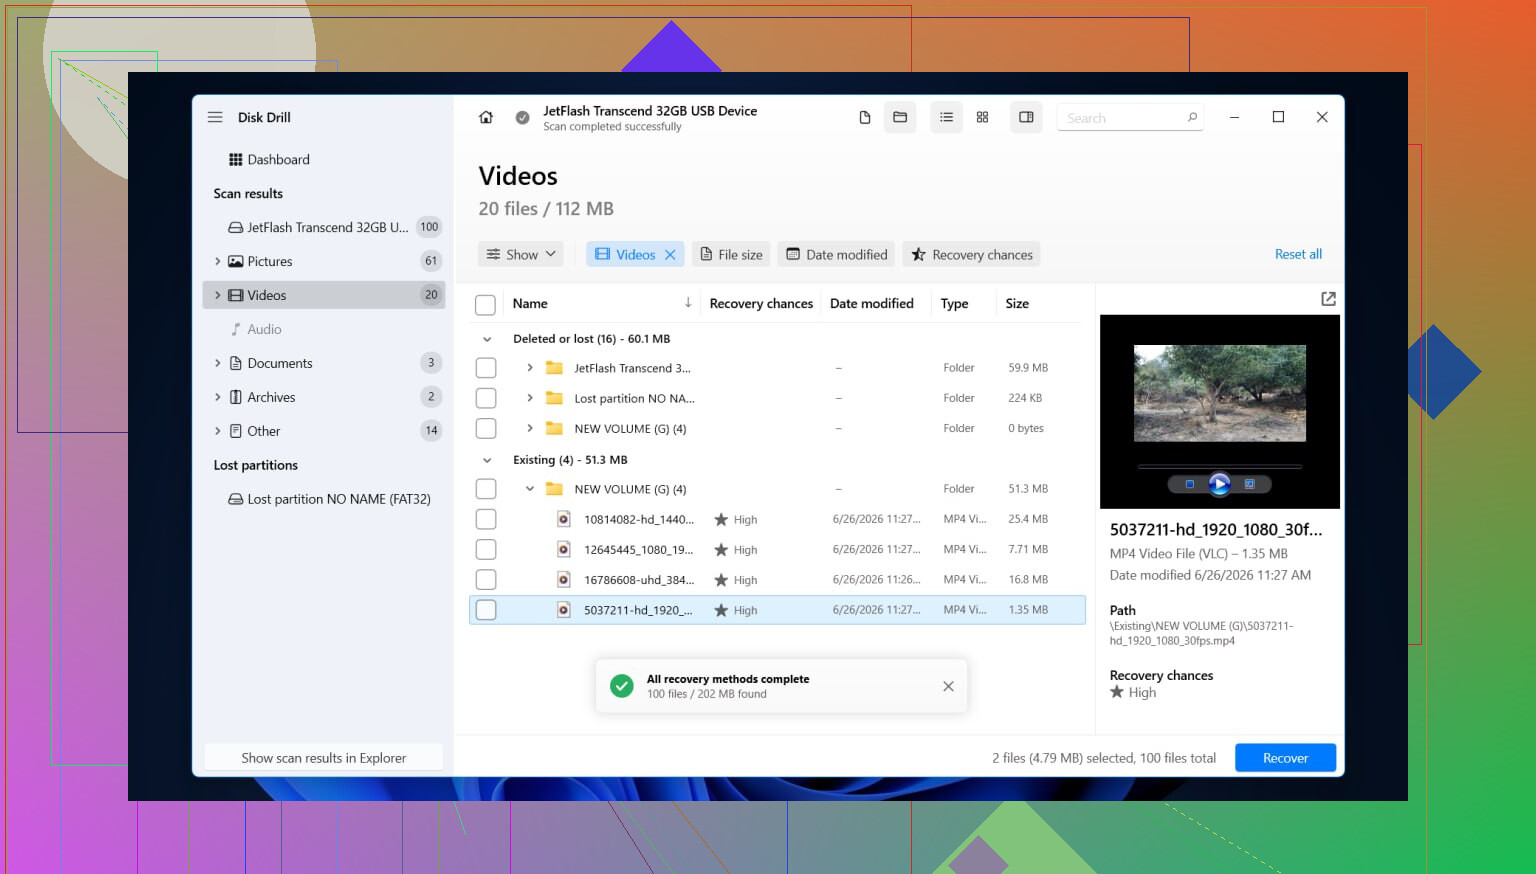
Step 2: Recover the files with Disk Drill
I’ve had decent luck with Disk Drill on RAW volumes because it doesn’t make you bounce between separate scan modes. You point it at the problem drive, let it run, and sort through what it finds after.
This is the way I’d do it:
- Install Disk Drill on a different disk. Don’t put it on the RAW drive.
- Open it and pick the RAW partition, or the full physical drive if needed.
- Hit Search for lost data and let the scan finish. RAW scans drag sometimes, so I wouldn’t stop halfway unless the drive starts acting up.
- Go through the results with the type filters or the search field. If folder view is available, check it. I’ve found it helps a lot when the original folder tree survives.
- Preview your important files first. Photos, docs, video files, whatever matters most. If previews open, your odds are better.
- Select what you want back.
- Recover everything to another drive. Never write it back onto the RAW partition.
If the disk begins disconnecting during the scan, or read speed drops off a cliff, I’d stop and make a full byte-for-byte image first. I learned this one late. Reading from the image is safer than hammering a sketchy drive over and over.
Step 3: Repair the drive after the data is safe
Once your files are stored somewhere else, then I’d work on the disk itself. The fix depends on what broke in the first place, so I wouldn’t treat every RAW partition the same.
Stuff I’d check, in rough order:
- Format it to NTFS if the file system is corrupted and you already got your data off.
- Repair or rebuild the partition setup if the partition table took damage.
- Assign a drive letter if Windows sees the partition but refuses to mount it right.
- Run CHKDSK only after recovery. It writes changes to the file system, so I wouldn’t use it as the first move when files still matter.
- Update or reinstall storage controller drivers and USB drivers if this started after a Windows update, or if the issue only happens on one PC.
- Replace the drive if SMART errors, bad sectors, or repeated read failures keep showing up. At that point I stop trusting it.
After it starts working again, I’d test it a bit before trusting it. Copy over a few large files, unplug and reconnect it, then check whether it still mounts normally. If it flips back to RAW again after a format, I’d take that as a bad sign. Usually the device itself is on the way out, and trying to save the hardware turns into a time sink.
3 Likes
Do not convert RAW to NTFS first. That is the unsafe path if your files matter.
I agree with @mikeappsreviewer on one part, recover first. I disagree on one common habit though. I would skip repair attempts early, even “light” ones. A RAW volume often means broken boot sector, damaged MFT, bad USB bridge, or failing media. Any write action lowers recovery odds.
My order would be:
-
Check SMART health with CrystalDiskInfo or smartctl.
If health is bad, temp is odd, or reallocated and pending sectors are climbing, stop using the file system level tools. -
Clone the drive first if the disk shows any instability.
Use HDD Raw Copy Tool or ddrescue. Work from the clone, not the original. This is the safest move for drives which freeze, disconnect, or read slow as hell. -
Recover data from the clone or from the RAW disk with Disk Drill.
Disk Drill is solid for RAW partition recovery because it handles lost partitions and file carving in one workflow. Save recovered files to a different disk. -
After your data is safe, wipe and format the original as NTFS.
Use full format, not quick, if you suspect media issues. Then test with large file copies.
If you want a simple guide on how to recover files from a RAW drive without formatting, this helps: watch how to recover data from a RAW drive before formatting
One more thing. CHKDSK on RAW usually returns “type of the file system is RAW” and does nothing useful, or worse, mutates metadata on a damaged NTFS volume. I woudln’t touch it until after recovery.

There really is no magic “convert RAW to NTFS without data loss” button. If Windows sees it as RAW, the safe path is recover data first, then format to NTFS. Anything that writes to that disk before recovery is a gamble.
I mostly agree with @mikeappsreviewer and @nachtschatten, but I’d add one thing: before doing deep scans, try the least invasive checks that do not write to the drive. Different USB cable, different port, different enclosure, or connect it directly by SATA if possible. I’ve seen perfectly fine NTFS drives show up as RAW just because the USB bridge was being dumb. Sounds silly, but it happens way more than people admit.
My order would be:
- Stop using the drive immediately
- Check if the drive is detected correctly in BIOS and Disk Management
- Try another connection method
- If it still shows RAW, recover files to another disk
For recovery, Disk Drill is a solid pick for RAW drives because it can find both lost file system data and carved files in one pass. Install it on another drive, scan the RAW disk, preview what matters, and recover to a different storage device. If the drive is unstable, clone first, then scan the clone.
Only after your files are safe should you format the drive back to NTFS. If it turns RAW again after that, the hardware is probly on its way out.
Also, if you want to compare tools beyond Disk Drill, this roundup on the top hard drive recovery and repair software for damaged disks is worth a look.
Short version: don’t convert first, recover first. That’s the safest method, full stop.
I’m with @nachtschatten, @andarilhonoturno, and @mikeappsreviewer on the big point: don’t format first. But I’d push one extra angle that people skip too often: verify whether it’s really a file system issue and not a partition-type flag or enclosure translation problem.
A drive can appear RAW even when the NTFS data is still mostly intact. Before any heavy scan, check the partition in a read-only partition tool and see whether the partition ID, size, and start offset still make sense. If those values are wrong, “recovery” software may still work, but you could waste hours scanning when the faster fix was identifying a bad USB adapter or corrupted partition entry.
My take:
- If this is an external drive, test it outside the enclosure if possible.
- If the partition boundaries look correct, then move to recovery.
- If they look wrong, consider fixing the partition map only after cloning.
About Disk Drill:
Pros
- Good at RAW volume scans
- Combines filesystem reconstruction with signature-based recovery
- Preview is useful for checking file integrity before saving
Cons
- Deep scans can be slow on large damaged disks
- File names/folder structure may not fully survive if metadata is badly broken
- Not the tool I’d use first on a mechanically failing drive before imaging
So my safest order is: hardware sanity check, read-only partition inspection, clone if anything feels unstable, then recover with Disk Drill or similar, then full reformat to NTFS only after files are secured.
One mild disagreement with the others: I would not jump straight into a long recovery scan on the original disk if it’s an external connected over flaky USB. That setup lies a lot.